
Yooz Mypad 702 Root With Magisk
by Editorial Staff![Yooz Mypad 702 Root With Magisk [No need TWRP Recovery]](https://mobilewithdrivers.com/extras/img/how-to-root-with-magisk-method.jpg)
On this page, we shared a complete guide on how to root your Yooz Mypad 702. In this article, you will find the best way to root any device using Magisk. We helps you step by step on how to root without TWRP Recovery. This is the best way and everyone can do it. Do this at your own risk.
How to Root Yooz Mypad 702 Magisk without TWRP Recovery
Here, you will get the two easy rooting methods such as SuperSU, and Magisk, you can use both to root access but for the last few years, everyone want to use the Magisk method to root their Mypad 702. A lot of developers also prefer to use the Magisk method. Magisk is a system-less root that helps you enable root access using the system components, it will not affect your system core files.
Read Me Once
- I just want to warn you that, Rooting will void the warranty of your smartphone
- Rooting will block the OTA updates
Pre-Requirements:
- First of all, you need to charge Yooz Mypad 702 up to 70%.
- We always advise you before rooting, you need to create a complete backup of all files and save them in a safe location.
- You can use this image file only for Yooz Mypad 702. Do not try to use it on any other device/phone.
- First of all, you need to connect your Mypad 702 to the computer using a micro USB cable.
- Download ADB and Fastboot files. [Windows]
- Download and install Mypad 702 USB Drivers.
- Download Other Drivers: Mediatek VCOM Drivers or MTK USB Drivers
- Download the latest Yooz Mypad 702 Stock ROM
- Download and install the SP Flash tool on your computer
Rooting will affect your Yooz Mypad 702 data. Before rooting, you need to create a backup and save all data such as images, videos, and files in a safe location. We will not be responsible for any bricking/damage to your phone while installing this ROM.
Quick Steps How to Extract and Patch Boot.image with Magisk?
First of all, download and extract the ROM from your computer.
Now, connect your device using a micro USB cable, and copy only the boot.img file from the extracted folder to your Mypad 702 phone memory.
Then, you need to Launch Magisk Manager.
After that, you will see a popup window that will ask you to install Magisk.
Now, Select INSTALL and choose to install it again, and Now, Press on “Patch Boot Image File”.

Then, Navigate to internal storage and select your phone’s boot image that you transferred earlier.
After that, you need to Wait for a couple of seconds. Magisk will start patching the boot image.
Once the boot image has been patched, copy the “patched_boot.img” from the internal storage and replace it in the same extracted ROM folder on your PC.
Now, you can follow the second step to flash the patched boot image file.
How To Install the Patched Boot Image on Yooz Mypad 702
Follow the given link to install the Patched Boot Image on Yooz Mypad 702:
We assume that you have already downloaded the ADB & Fastboot tool from the link given above.
Now, extract the ADB fastboot tool, then move the patched boot image to the same folder.
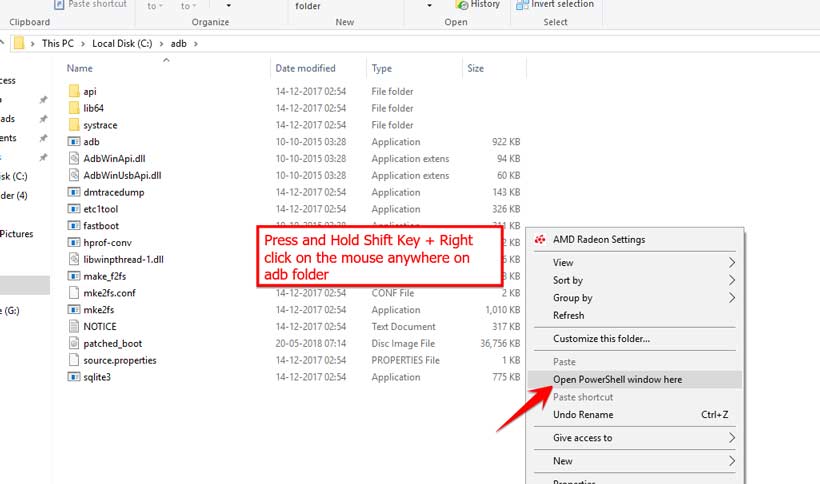
Hold the Shift key and right-click on the mouse to open the command window/PowerShell.
- Next, enter the following command:
- Flash the “patched_boot.img” to install Magisk and root your Android device: fastboot flash boot patched_boot.img
- For devices with an A/B partition system, use the following commands: fastboot flash boot_a patched_boot.img
- fastboot flash boot_b patched_boot.img
- Please replace [patched_boot.img] with the name of the boot image file you downloaded followed by the .img extension.
- The flashing process will begin. Once done, run fastboot reboot
How to Verify if your phone has a systemless root?
Download and install the Magisk Manager app APK, and launch it.
To verify that you have a correct systemless root, check the top of the screen, and if you see all options with Green Tick it means you have successfully rooted and bypassed SafetyNet.

So, that’s it. Now that you have rooted your Yooz Mypad 702. If you have any queries regarding this, do let us know.
Now, if you would like to uninstall Magisk, follow the below steps: It is very easy to uninstall the Magisk Manager app. Before uninstalling Magisk, make sure to disable and remove all the modules.
How to Uninstall Magisk and Unroot Android
- Open the “Magisk Manager” app on your phone.
- Now Tap on the “Uninstall” button to uninstall Magisk
- After that, confirm uninstallation by taping the “COMPLETE UNINSTALL”
- Once the uninstallation process is done, you can reboot your device.
How to Root your Yooz Mypad 702 without Computer?
- First of all, enable the unknown source application, –>>> Go to Settings, – >>> Security, and Tick the option “Unknown Source”
- Make sure that you have downloaded the KINGROOT APP download from the above link.
- After that, you need to Install the Kingroot on your Yooz Mypad 702
- Now open the Kingroot App, then please check whether the phone can root or not.
- You will see a button to root, Now it is your choice whether would you like to root your Android phone or not. If Yes Click it!
- The 6th step is “Don’t press any other button, you will click on continue to root your device.
- Don’t worry, if it will take a few minutes, so be careful and please wait. In case your phone reboots or restart during the rooting.
- So be patient, and please wait until after the restart, you can start again Kingroot app.
- Finally, you will see a message that the root has been done successfully.
Read Me Once
The rooting process will affect your Yooz Mypad 702 device data like images, videos, and files. We advise you before starting rooting you need to create a backup and save it in a safe location.